About this Blog

This is about the combination of two interests, Radio Control vehicles and Science Fiction models. This blog documents my science fiction spaceship and radio controlled vehicle projects.

Friday 28 July 2023

Dart Scout ship part 2

 I have finished the paint and weathering on the Dart Scout Ship project.

It was not without the usual paint dramas which as usual was incorporated into the heavy weathering.

I decided to try a bare metal finish once again using the AK Xtreme metals paints. The model was sprayed with their black gloss base coat and then with white aluminium metal colour. These paints are enamel based and use a pretty strong smelling thinner. I left it to dry for a whole 24 hours and then applied Scotch Blue sharp lines masking tape which I have used many times before on various paint surfaces. Once the other colours where applied, mainly dark grey and flat black I peeled away the masking tape to find the gum had reacted with the metal paint surface and remained stuck to it leaving a sticky mess and a very spotty finish. I cleaned the gum off using Wax and grease remover which did not affect the metal paint but did start rubbing off the dark grey which was from a spraycan of Rustoleum Slate.

The result was an interesting fine grained weathered aluminium effect which would have been impossible to achieve if I tried to do it deliberately.

Oh well, no matter how hard I try, my models always end up heavily weathered and I have come to accept these paint disasters as part of the "happy accident" weathering process.

I now have a second new model to display at this year's WASMEx 2023 which is in a weeks time. WASMEx is an acronym for Western Australian Scale Model Exhibition which is held in Perth Western Australia.

The finished model is 255mm long including the rear probe with a wingspan of 215mm.


Thanks for looking.

More soon...


Tuesday 25 July 2023

Tanker spaceship part 1

 Way back in October 2016 I started the container spaceship project series (which is still ongoing). In this first part I detailed the making of the engine section which although very nearly complete in terms of construction was ultimately rejected for a new design much more in keeping with the original inspiration.

This abandoned engine section lay around for a number of years until I came up with an idea to use it for a large tanker spaceship in September 2021. This was prior to starting the Merchant Vessel project. In fact I started building a front section for this tanker ship which you may recognize, it actually became the inspiration for the just completed Heavy Salvage Tug. It, like so many other sections of spaceships I design and construct was rejected for its initial purpose and re-used elsewhere for an entirely different ship. 

You can see the original design thumbnail below. I followed it up with a 2D CAD drawing to figure out the sizes of all the components.

Original rough design thumbnail drawing.

2D CAD layout drawing.


The abandoned engine section constructed for the container ship was basically complete and just needed some way to join it to the rest of the tanker ship's spine. I ended up using a couple of molded plastic speaker ports one for the engine module and one for the eventually rejected dome front end. The speaker ports had slots cut into them so they could slide over the cross shaped wooden spine.


The spine was built from pine wood with 15mm water pipe fittings for a mount top and bottom. The water pipe mount was secured using a liberal amount of baking soda and thin super glue. many lightening holes were cut using a hole saw on a drill press.


The pictures show the original layout with the soon to be rejected front end and the engine module in place.


The spine was then covered with 1mm thick styrene sheet glued on with thick super glue. I only covered the areas that would be visible once the tanks are in place. Holes were made in the wooden spine to route the 12 volt lighting wires.


You can see above that I added the edge banding strips of styrene first and then added the outer skin leaving a degree of overlap. This overlap is then planed off using the edge of a steel ruler  and sanded with fine grit sanding stick leaving a very tidy invisible join.

The tanks were made from lengths of 100mm PVC storm water pipe, although the actual OD is more like 110mm. The vessel ends on the tanks were made from cheap battery push lights from the hardware store. The inner shallow domes were pretty close to the exact diameter of the PVC tubing. The lights were disassembled and the domes cut down using a simple wooden jig on the bandsaw. These were then superglued to the ends of the PVC tube.

The picture below shows the lights as they come on the left and the part once cut on the bandsaw on the right.


Some method to retain the tanks was designed, all the parts cot out in styrene sheet and then assembled and glued together. These retainers are designed to sit over the central spine top and bottom. Styrene strips were then glued on the PVC tanks to line up with these retainers so it looks like some sort of strap system. Like the Heavy Salvage Tug the tanks will be painted different colours to seem as if they are a standard shipping vessel and come from various sources, much like the shipping containers of today.


Previous photos were all taken on the old workshop in 2021. The following photos are recent and taken in the new workshop.


Finally I ended up rejecting the front end as I felt it did not really match the engine section. Alternatively my parents asked me if I could use their old broken coffee machine. It usually depends on whether it has an interesting shape and whether it is made from a useful plastic and luckily for me it passed both tests, made from ABS and crucially suggested an interesting front end for this spaceship.


The model will be at 1/48 scale and will measure around 1240mm which in the ancient mystical measurements of the imperial druids is just over 4 feet (nearly 49 inches).

All the work described so far happened in 2021 before September when I started the Merchant Vessel project.

Thanks for looking.

More soon...

Heavy Salvage Tug part 4

 The Heavy Salvage Tug project has been completed.

I finally have something new to display at WASMEx 2023 which is coming up on August 5th and 6th.

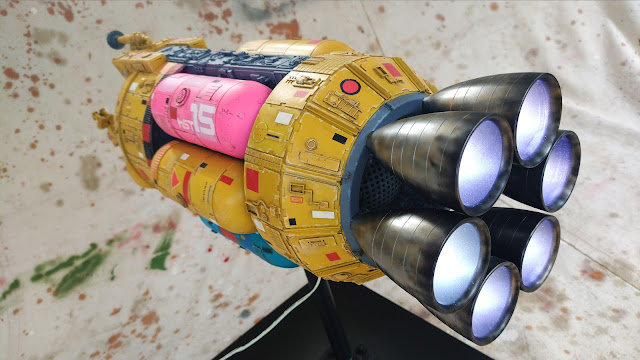
The base colours were laid down using spray cans. The yellow was a Dupli-color Sunflower Solid (Hyundai) which was a warm yellow and the tank variations were sprayed using some Montana Gold spray cans I found in the craft store. While the colours are pretty cool the quality was a bit hit and miss. The pink can had a faulty spray nozzle which just spurted out from under and went everywhere. I ended up having to steal the nozzle from the red can which worked fine. The pink came out very matte which was fine, whereas the other two colours were more a satin finish. The blue or Turquoise came out with a very textured finish which was also odd.


These sort of paint issues are a quite common occurrence for me and I have learned to accept these inconsistencies and absorb them into the weathering process. I suppose it is because I prefer to use spray cans for the main colours for my relatively large models rather than try to airbrush everything.

The pictures below show the base colours applied to the model. Certain sections I left in dark Grey primer and the engine bells are still in primer. They will get some AK Xtreme metals applied next.


Some panels I picked out by hand painting some Lifecolour acrylic hobby paints. Various random rectangles were applied using hand cut white and red vinyl as well as some antique black Letraline. The main white HST15 graphics were printed out onto paper and then stuck on low tack masking tape for cutting out with a scalpel. A second layer of slightly tackier masking tape was then used as transfer tape to lift the cut stencil from the cutting matt and apply it to the model. One of these days I will try and find one of those small cnc vinyl cutters (Cricut, Silhouette or Brother) for this task as it would save a lot of agonising steps. Problem is I feel they are a bit pricey at the moment, second hand is likely the answer for me.

Other black lettering and numerals were applied from some ancient letraset dry transfer sheets I still have, must be at least 30 years old.

A wash of my usual recipe of brown poo juice ( Tamiya flat black and brown heavily diluted with methylated spirits) was carefully applied so as not to remove the water based acrylic paint additions.

Students acrylic paint from a tube was dry-brushed over all the raised detail.

Lifecolour acrylic paints in a shade lighter than the base colour was then hand painted around the panels for chipping and scratching. The largest chips were then given an inner touch of grey to look like the paint had scraped through to primer.

Decals that looked like they belonged were then applied with some setting solution ansd the whole lot was given a spray of matte varnish to seal the decals and dry transfer lettering which resulted in the low sheen finish you see in the completed model pictures below.


Any questions, don't hesitate to ask, happy to answer.

Thanks for looking.


Most Popular Posts in the Last 7 Days