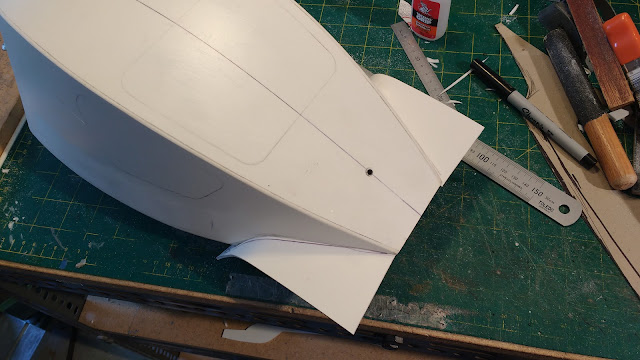
I started to construct the part of body where it meets the chassis. Using cardboard I made up some templates that closely fit around the Jato chassis and then cut the final shapes in more 2mm Foamalux (Foamed PVC sheet). Whilst the body was in position on the chassis I made up small gussets that linked the bottom sheet to the rest of the body and then proceeded to add doublers to all the edges to give a larger surface area for gluing on the lower sides. The supporting edges were then sanded with a sanding stick with 80 grit wet and dry, to the correct profile. Cardboard was once again employed to rough out the curved shapes required and transferred to the pvc sheet with a generous allowance to counter slippage while super gluing and then sanded back flush to finish.
I then made up some front mudguards in much the same way, leaving lots of extra material to be shaped once the glue has set which isn't very long using a spray of superglue accelerator. The foamed PVC can be coaxed into bends by hand and also by the judicious application of a hot air gun. The mudguard panels were kept level whilst gluing by clamping them to a piece of wood across the front.
Next I cut out a template out of 1mm styrene to scribe around the door opening shape using a scriber. The foamed PVC sheet takes indentation well and it leaves a permanent groove. I used the same template to scribe an outline for the side door window openings. I first used a large step drill to make some large holes in the windows near the corners (step drills tear through this material like crazy), then using my trusty olfa snapper knife joined the holes carefully punching out the rough opening.
The windows having been sanded to the final outline were filled in with thin sheet polycarbonate after first roughing the gluing surfaces with coarse sandpaper to enable the superglue to bite. To get the radii of the window openings clean and accurate I have a few bits of dowel of different diameters with sandpaper stuck around the circumference with double sided tape to use as round sanding sticks.
In the picture below you can also see a couple of semi circular cutouts in the mudguards for clearance where the front shocks pass through.
I moved the driver figure forward as he was too far back once the windows were cut. His rear mounting post had to be moved and a little plate made for the front post to meet the screw hole in the figure. I then added a bulkhead in the body behind him.
This is where I am at so far and I feel it is coming together well. My motivation to keep on with it is high so I am hoping to carry this project through to completion...
More soon...


No comments:
Post a Comment