
The Creeper 6X6 project is now complete.
The primer grey model was sprayed with primer flat white and then random panels were masked up and sprayed with a satin off white colour and a satin white. All these paints are from spray cans of the Rustoleum 2X cover range.

I then took a photo at that stage and fiddled about in photoshop to determine a pleasing marking scheme.

The red markings were masked up and sprayed with an ancient tin of Humbrol flat red. The edges of the masking for the red markings had a few dabs of liquid latex masking medium to leave some chipped edges. Stupidly I only did this on one side forgetting to do it on the second side. Some dabs of white paint and some rubbing with a rag dampened with methylated spirits during the application of the wash soon remedied that omission.
The numbers were designed on Inkscape and then printed out full size on paper. The paper numerals were then stuck with double sided tape to some masking tape applied to the model. The outline of the text was then carefully cut around with a scapel using a steel ruler for the straight bits and freehand for the curves. The number shapes were then peeled out and the numerals sprayed with flat black. It is not perfect up close but is good enough to pass.
That was left to dry out for a week and then I began the weathering process by applying a brown wash of Tamiya flat black and red brown mix heavily diluted with metho into all the scribed panel lines and around the edges of any detail. The grey roof detail sections received a flat black wash to further accent the recesses. Then using a metho soaked rag the surface wash was wiped clean in the direction of any desired streaks. The grey parts were then drybrushed using white students acrylic paint
The Humbrol red paint even after drying can still be loosened with the metho rag so I had to be careful not to rub it all away. I do however like the effect it has on weathering the paint, making it look sun and rain damaged. One just has to be judicious in the application and wipe off the red residue on the white areas which are not effected.
Using an acrylic grey paint I then added some chipping to the exposed bits of the body that would be susceptible to any graze damage. I also used applied this treatment to any paint finish anomalies to cover them up.
The last thing was to add a few decals, mostly from the sheet I made up for the Moon Bug project. Once the decals were dry I masked up the panels they were applied to and sprayed a coat of clear flat. The red dot in the middle of the black zero in front of the three is also a decal. It just happened to fit and I liked the graphic effect.
Finally here is the completed model.


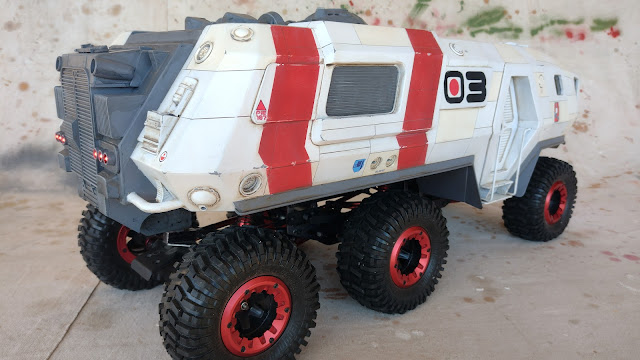


Only eleven years in the making. I think it has turned out the way I had hoped when I started the project back in 2011. It was a very tortuous route but I learnt a lot along the way and it was the genesis for many of my completed RC vehicle projects.
Thanks for looking.
More soon...


