About this Blog

This is about the combination of two interests, Radio Control vehicles and Science Fiction models. This blog documents my science fiction spaceship and radio controlled vehicle projects.
Showing posts with label Beadlocks. Show all posts

Friday, 17 July 2020

Moon Bus part 9 completed.

I had a bit of a disaster in the painting process which is something I always dread.
The big problem was the paint, top coat and primer just came straight off the black styrene as soon as any masking tape even low-tack got anywhere near it. It flaked off in sheets. It was very depressing.


It all had to be scraped off where the masking was eventually going to be placed, to be re-primed and top coated.  Strangely the dodgy primer stuck much better to the parts made from white styrene like the evergreen textured sheet, though small bits were still pulled off with any masking tape application. In these areas I did what I usually do and applied some hair dryer heat to the masking tape as I removed it which aids in softening the gum and preventing small chips coming off.


I did a bit of research to try and figure out why this occurred as it has happened to me randomly in the past. Sometimes the primer is absolutely perfectly fine and very occasionally I find it comes away with the masking. I found a very useful bit of information on you tube about the types of primer I usually use, namely car primer in an aerosol can.


Turns out there are two types available to me locally one good and one bad and I had three cans with both types represented. I sprayed the three different cans I had in sections over some black styrene and after it had dried applied some masking tape. Pulling the masking tape away was extremely revealing. The primer I had used came completely off and the other two had remained intact. The picture below shows the three cans I tested.


 The can on the left was the one I used on this model which failed miserably. The other two behaved as one would hope, they stayed on the surface. It turns out the cans that say Multi Surface work very well on plastic, they even state they work on fibreglass on the back. The one that is labelled acrylic primer appears to be absolutely useless on plastic and therefore I will not use it ever again.

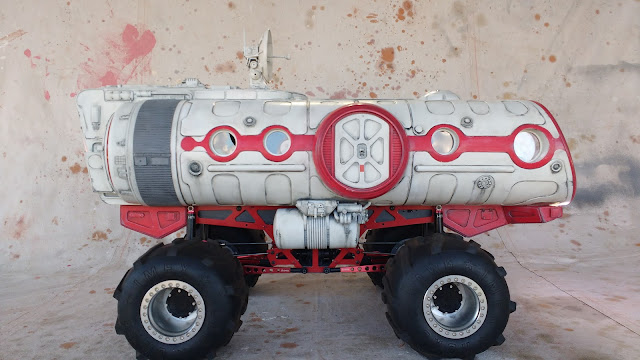
Before this all happened I had decided on a predominantly white finish with some sort of red stripes to match the red on the chassis. Below is the model with the base colour applied which I took into photoshop and tried out a number of various versions of red accents finally deciding on the colour rough shown in the second picture which helped to highlight the shape left between the panels that flow around the windows.


This red motif was then masked up extremely gingerly and sprayed with a small can of Ford Blaze red. The white was actually a warm off white called Antarctic white. Once that was done I re-evaluated the front end and decided that maybe the front panel needed some colour as well. So back to photoshop just to check and the colour rough that resulted shown in the second photo below was more to my liking.


My old weathering technique using a mix of Tamiya flat black and ethanol ( methylated spirits) as a dirty wash was employed. The surface is then cleaned off using a rag damp with ethanol leaving the grunge in the crevices. Dry brushing with a light grey students acrylic followed. Detailed scrapes were painted with acrylic hobby paints, a light grey surround with a dark grey core.

Another of the painting tasks was to paint the occupant figures, something I am pretty terrible at. In an attempt to try and improve in this area I watched a lot of You tube videos on figure painting in acrylics. Below is the result, still pretty poor but a lot better than my previous attempts.


The figures were superglued into their seats and the front panel screwed into position. To hide the screw heads I found a piece of red self adhesive vinyl and punched out some small circles that were pretty much the same diameter as the screw holes. The colour is not an exact match but I think it will do the job. I also used a few pieces of the red vinyl in other places on the model.


The solar panel cells on top were picked out with random squares in three shades of grey.


Finally here is the completed model.


Part 1 of this project was way back in October 2014. Part 2, 3 and 4 was a year later in October 2015. Then nothing until 2020. This project has been spread over nearly 6 years so it is satisfying to finally bring it to completion. It's also the third completed model for 2020 which as we all know has been and continues to be a very unusual and challenging year.

Thanks for looking.
More soon...

Thursday, 21 May 2015

Toy Bash Truck

Part 2, Part 3, Part 4, Part 5


More than a year ago now I was looking at the toys in a discount store that may have interesting plastic shapes and found this rubbish truck toy which was not too expensive.

A little bit later I purchased a Bruder large tracked dozer thinking It might be fun to try and use the tracks for something. The cool thing about the Bruder range of toys is that they are all at a standard scale of 1/16 and reasonably accurate to the subject at least as far as most toys go. The pain of the Bruder toy range is that they use no screws in the assembly, its all tabs into slots with barbs that make it fiddly if not downright difficult to pull apart. Anyway it sat around in a box in bits for quite some time.


Some months later I found another of the rubbish truck toys for $3.50 at a thrift store or charity shop as its more commonly referred to in Australia.


Many more months later (only last week) I had the idea to see what would happen if I put them all together. Here is the result of that toy bashing.


Its basically the dozer cabin, back to front, joined to the combination of the two back ends of the rubbish trucks joined end to end, split down the middle and widened. A pile of 2mm styrene ties it all together. Parts off the dozer and the truck are re-purposed for detail bits and pieces along with a few kit parts, a small amount of foamed PVC and more styrene and assorted evergreen strips and textured sheet. A few of the urethane cast parts have also been employed here and there. It has a wooden frame underneath for reinforcement.
The wood is superglued to the plastic parts with thick superglue. The plastic is sanded with very coarse sandpaper to roughen the glossy surface so the superglue has something to mechanically bond to. All the PVC and Urethane parts are also superglued with a sanding treatment first.


The chassis, which is still to be completed, is based on a Venom Creeper seeing as I had a few parts still left over from the Creeper 6X6 project.
Here is the body work balanced on top of the chassis so far to give a rough idea of the way it will sit.


The yellow lump at the back is from the rear of the bruder dozer, here upside down. There is some work still to do at the back and quite a bit more to do at the front including adding a driver figure and fitting a seat. The original cockpit has been cut up as it faced the otherway. I may be able to adapt the existing seat for re-use, its not a sinple exercise at it was all molded in one at an angle with the rest of the interior. Much butchery has had to take place to extract it.
The wheels and tires are the old Axial Rockster beadlocks with Rock Lizards which, true to form, I have had sitting in a box for years waiting for a project to come along.

You can see how messy the bench gets with all the butchering and sanding of parts to get them to fit. I think I'll have to have a clean up before going much further.

More soon...

Part 2, Part 3, Part 4, Part 5

Tuesday, 28 October 2014

Moon Bus part 1

Here is another project that has been commenced, I'm calling it a Moon Bus. Below is the rough design thumbnails. The design started with the tyres, I have had a set of Imex truck pull Clodbuster tyres sitting around for quite a few years, but have never had any rims to fit. The other trick is that these tyres did not come with any foams. One of my random Ebay trawls came up with a really cool set of rims that would be perfect for these tyres and a sci-fi flavoured project...

Moon Bus design thumbnails.


 The rims are an older version of the RC4WD Clod beadlocks which are no longer available. I think you might still get a later revised version with a seperate interchangeable hub. These have a 14mm hex socket and came with some splined 14mm hexes designed to mate with the Tamiya Clod Buster splined axles. They are really beautifully machined and this set does not appear to have been used much, if at all. The front beadlock rings have a number of cosmetic non-functional very short cap screws with 8 functional ones like the back rings. The beadlocks actually completely seal the tyre so they remain effectively pumped up without any foams in place. They have sat around like this for several months now and still have not deflated. They have a massive machined hub which screws in to hide the wheel nut and the rims are really thick and quite heavy.

The two chassis plates I made from 3mm aluminium sheet, drawn up in Delta Cad, printed out, spray glued onto the aluminium and all the inner hole radiuses were drilled out. I then used a scroll saw to cut out all the holes finishing up with hand filing.  The blades for the scroll saw although designed for wood will cut thin aluminium but dont last as long. I went through quite a few. These were made way back in 2002. The shape being inspired by the Tamiya TXT-1 monster truck. I was planning to build a monster truck at the time but it never got very far.


My original CAD drawing from 2002.

The plates have been cut and shunted a bit. Originally the idea for the monster truck was for the battery to sit low down on the extended sides, these have now been chopped and moved to support the upper links. The axles are a set from a Venom Creeper that have a manually switchable diff lock. The transmission is from a Creeper as well. It does not have a slipper clutch which could turn out to be an issue. The lower links are Axial machined high clearance links just because they look cool and I already had a pair which I got to try out on the GrassHopper project for which they didn't turn out to be suitable.
It took a lot of fiddling to sort out the shock placement. They have ended up pretty much in the monster truck vertical position. They have to be able to push up the heavy body without it flopping over to one side that the usual angled crawler shock position encourages. The shocks are a set of Hot Racing oil-less ones that rely on air damping. They look cool but I am not all that convinced of their efficacy.
The Creeper axles have a really annoying angled shock link mount so I had to make up a set of PVC adaptors so the shocks could mount vertically without binding. They are captured by some vinyl fuel tubing bushes which permit flexibility of movement. The first set I made were straight but this meant the shocks were too tall so I made some curved versions. The curved versions restrict the steering throw a bit but as this vehicle has 4 wheel steering it may not turn out to be a problem. As yet I have not tested it. The second hole was added in case there was a need for a sway bar set up.

Discarded straight adaptors.

Revised curved adaptors.


These were extremely fiddly to get right. It would have been sensible to have just used Axial axles except that I like the ability to use a proper unlocked diff given that this is not really a hard core rock crawler.
The other difficulty was getting those beadlocks to mount up. I needed some form of widener to get enough clearance so the rims did not foul the knuckles and the links especially when turned. I ended up getting some Integy 12mm to14mm hex adaptor wideners. They came with two sets of barrel nuts, short and long. The long ones were not long enough. Those beadlocks have about 10mm thick hubs whereas most plastic wheels have only about 3 or 4mm thickness. The project ground to a halt for many months at this point while I contemplated what to do. In the end I made my own barrel nuts from some 6mm bolts. I got some 60mm in length M6 bolts and cut off the thread. The remaining bolt shoulders were drilled out and tapped M4 to fit the axle thread and the beadlocks had to be drilled out slightly to fit the 6mm bolts which are actually only 5.8mm in diameter. I have a set of metric drills that go from 1 to 5.9mm in 0.1mm steps, very useful for tapping and clearance hole sizes.


I think the Integy wideners are too wide, if I could find something that has a much smaller offset and a 14mm hex I would swap them out. It would also reduce the amount of tyre scrub when the steering is turned. In an attempt to shorten the offset as much as possible I used machined down Axial narrow aluminium hexes designed for 1.9 sized wheels.

A start has aslo been made on the body. A wooden frame has been cut and assembled. It comes out at about 1/16th scale. I need to get some suitably scaled driver figures. I think the Bruder toy range of figures may fit the bill.


The body is held on by 4 X M4 cap screws which pass through holes in the chassis and thread into plates screwed to the wooden frame.


One of the servos has a servo reversing lead so the 4 wheel steering works correctly in opposite lock.
I need to make up a battery tray and mount the electronics, then I can test it out...more later.

Part 1, Part 2, Part 3, Part 4, Part 5, Part 6, Part 7

Most Popular Posts in the Last 7 Days