The original Creeper 6X6 project stalled for some time as in the end after building the frame work for the body I came to not like the original design. Years later after doodling around in my sketchbook I came up with this thumbnail that showed some promise and got me enthused to continue on with the project.
The thunbnail was scanned in and used as a reference image to draw up some CAD using DraftSight.
Over a couple of weekends and in a spurt of enthusiasm, some white 2mm styrene (HIPS), black 1mm styrene and a small amount of 1.6mm ABS was cut and glued together.
The windows are 2mm acrylic (perspex) with masking tape on the inside and out. There turned out to be a bit of a discrepancy between the length of the side window on the cad and that of the model. That was because of the increase to an18mm bevel between the sides and the roof which shortened the height of the side windows, changing the proportions somewhat. I did not do a rough computer model of this body like I usually do so all the issues of conversion from a flat side view to a 3 dimensional model come out in the building. In the end I determined that the proportion of the full length side windows did not really suit the more enclosed front window so I filled in the lower portion of the side window. I am tempted to add a pillar to the side window as well to bring it more in line, we'll see.
There is an access hatch to outfit the cockpit. A tab slots in under the raised roof section and a magnetic catch at the front secures the door.
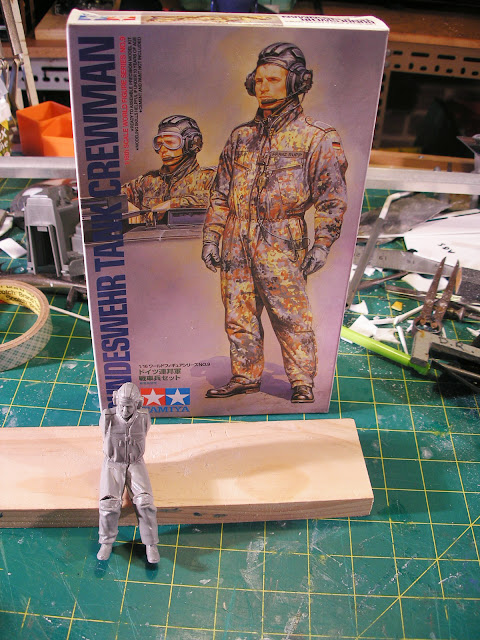
Determining that this seems about 1/16th scale I needed a couple of like scaled crew members to outfit the cockpit. I happened across these Tamiya Bundeswehr crewmen at 1/16 the scale. They would need a bit of work to get them into a seated position from the standing pose they are molded in. In fact in the kit there is a standing man and a half man (upper torso) to stick into the turret hatch with suitably bent arms. I got two kits as I needed two sets of legs.
You can see some of the "plastic surgery" that has gone into getting him into a seated pose. The torso has been glued to a sanded flat spot on what was his fly in his pants. The knees have had a wedge removed from the back, the legs glued angled and the missing piece replaced to fill in the gap at the front. next up will be some filler to make him a bum, and fix the savaged knees. I like the headphones look they have. For the moon bus project I recently got some Bruder Toys men which are nicely articulated to be able to sit and are also 1/16th scale.
The side doors are made from those battery press lights I have harped on about in the past.
All the rounded corners in the panels are done by drilling the correct radius hole (with a step drill, very good for plastic, doesnt grab as twist drills tend to) on pre marked centers and then cutting the straight lines to line up with the tangents of the circular holes. This is relatively easy on flat sheets, it as a bit more difficult on the dome shape.
The chassis has been completed and sprayed satin black with rust guard epoxy paint. Also the suspension has been reworked, namely the verticality of the shocks and their placement higher up on the frame to help with weight issues. No surprises there there is always a weight issue with bodies that are more than a piece of thin vac formed lexan. The solution is to get the shocks in a vertical monster truck position rather than an angled crawler position otherwise the top heavy body flops to one side or another.
I have also added body fixing plates in the same way as the Moon Bus project part 1
Note: There was originally a part one to this project but somehow in an attempt at editing the post it got deleted, so I will attempt to create the part about the building of the Chassis in a following post.
More soon...
Creeper 6X6 chassis part2 is here


No comments:
Post a Comment