At the end of the last post I decided to add a few more nurnies to the front of the cab and have now done so completing the construction process by finalising the primer.
Then it was into photoshop to come up with a suitable colour scheme. I wanted to go bold with the colours for this truck and looked over a number of vehicle concept art pictures I have collected from the internet for inspiration. Here's what I arrived at as a very rough paintover of the primered side view;
I went to the auto parts shop and purchased some spray cans in the appropriate colours. The first can I tried was an old one that had been sitting on the shelf for quite some time. On pressing the trigger an ooze of thick goo came out of the nozzle. I shook it up some more and tested the spray on a piece of wood and it seemed to come good so I started spraying the model... the spray coming out was not a fine mist but a series of thick blobs. I tried the other similar colour I purchased and it was a newer can and sprayed a perfectly fine mist. So one side ended up with a thick textured finish and the other was more like I was expecting. This ended up causing me problems as the too thick acrylic lacquer paint and the perfectly fine primer will start coming straight of the styrene when you pull off the masking tape. It seems to dissolve the primer styrene bond interface and the stuff will almost fall off which it did in several places. Everytime I removed some masking I had to repair the paint, the model needed and got more and more heavily weathered through the process. The other issue is that I am trying to complete this model and at least another before exhibiting them at the Perth SupaNova event coming up in nearly a week and a half, so there is a deadline. I am taking some holidays before the show to get them done and I dont need any more disasters besides the fact thet the weather has not been conducive to paint drying.
The model is now pretty much done except for a voltage booster board from Hobby King to power the 12 volt lighting from a 7.2 volt battery. I have had the board on back order for a number of months and still no show.
Here is the result of the last few days;
On to the next model for completion.
More soon...
About this Blog
This is about the combination of two interests, Radio Control vehicles and Science Fiction models. This blog documents my science fiction spaceship and radio controlled vehicle projects.
Showing posts with label plastic. Show all posts
Tuesday, 12 June 2018
Kong Head Toybash part 3
Labels:
1.9 tyres,
4WS,
6x6,
kitbash,
Kong Head,
plastic,
radio control,
RC,
SCI FI model,
Sci Fi vehicle,
Tamiya,
toybash,
Venom
Monday, 21 August 2017
ToyBash 2 part 2
I installed the nerf guns on the sides.
A piece of 10mm foamed PVC supports the sides of the guns which was perfect as the removal of the handle left precisely a 10mm gap.
A part from the Bruder Dozer that was removed to allow for the motor module to fit was added as a hub detail.
I cut up the hubs from the Wall E truck wheels that originally mounted here and re-used them to mount to the support arms along with a small nylon spacer turned on the mini lathe. They are held on with the original screw so they can be removed for working on and painting.
It looks kinda kooky at the moment, the arms hang down off level which I like, gives it a bit of gunslinger attitude. Hopefully with more detailing and primer it should all come together in the end.
I am thinking about some form of cheap led light chaser effect that would be visible in the long horizontal slot in the "laser rock cutters".
I have also been working on the cabin and adding some bits and pieces to the underside and building up a hood at the front using a couple of bits of an old Zoid toy.
From the side the front now looks a bit like a triceratops which I am quite happy about.
There is still more detailing in this area to go, I am going to add some checkerplate walkwaysalong the side as I have some 1/25 scale checkerplate styrene sheet that I have had for years and never found a use for.
I also hit the back tank section with some red oxide primer to see how its traveling... needs more pipes, probably some single core wire will finish this bit off.
I finally got around to wiring up the motors and testing them by connecting a battery to each one and watching it trundle forward down the hall straight as a die.
It works, as predicted a bit slow on 7.2 volts, but if I can find a pair of forward and reverse brushed motor speed controllers able to take 4s cells otherwise known as 14.4 volts they should be fine. I disconnected one of the batteries to observe the skid steering and it also works well. I suspect the ABS plastic tracks will scratch easily and I am not excited about trying to paint them, I just wish they were made from grey plastic rather than yellow but apparently you can get replacement tracks direct from Bruder in Germany and they do have grey versions but a shorter loop for an excavator model. Might have to get more than one set if these ever get used enough to wear out.
More soon...
A piece of 10mm foamed PVC supports the sides of the guns which was perfect as the removal of the handle left precisely a 10mm gap.
A part from the Bruder Dozer that was removed to allow for the motor module to fit was added as a hub detail.
I cut up the hubs from the Wall E truck wheels that originally mounted here and re-used them to mount to the support arms along with a small nylon spacer turned on the mini lathe. They are held on with the original screw so they can be removed for working on and painting.
It looks kinda kooky at the moment, the arms hang down off level which I like, gives it a bit of gunslinger attitude. Hopefully with more detailing and primer it should all come together in the end.
I am thinking about some form of cheap led light chaser effect that would be visible in the long horizontal slot in the "laser rock cutters".
I have also been working on the cabin and adding some bits and pieces to the underside and building up a hood at the front using a couple of bits of an old Zoid toy.
From the side the front now looks a bit like a triceratops which I am quite happy about.
There is still more detailing in this area to go, I am going to add some checkerplate walkwaysalong the side as I have some 1/25 scale checkerplate styrene sheet that I have had for years and never found a use for.
I also hit the back tank section with some red oxide primer to see how its traveling... needs more pipes, probably some single core wire will finish this bit off.
I finally got around to wiring up the motors and testing them by connecting a battery to each one and watching it trundle forward down the hall straight as a die.
It works, as predicted a bit slow on 7.2 volts, but if I can find a pair of forward and reverse brushed motor speed controllers able to take 4s cells otherwise known as 14.4 volts they should be fine. I disconnected one of the batteries to observe the skid steering and it also works well. I suspect the ABS plastic tracks will scratch easily and I am not excited about trying to paint them, I just wish they were made from grey plastic rather than yellow but apparently you can get replacement tracks direct from Bruder in Germany and they do have grey versions but a shorter loop for an excavator model. Might have to get more than one set if these ever get used enough to wear out.
More soon...
Labels:
1/25 scale,
Bruder,
conversion,
kitbash,
plastic,
radio control,
rc vehicle,
scratch build,
toybash,
Wall E Truck
Sunday, 30 October 2016
Container spaceship part 1
I have been on a bit of a roll completing two projects in quick succession and have been endeavoring to continue on with that theme and complete some of the many unfinished projects that I
have cluttering up my shed. Unfortunately, against my better intentions, a new
project formed on the work bench in front of me. Actually it formed in
my head first and then I couldn't stop myself.
I was looking through an old display book where I had put some inspirational spaceship pictures way back in the 90's and came across a tiny sketch that I had enlarged and printed out from a Japanese modeling magazine. I really liked the design of the container space ship which is like a giant version of an Eagle transporter and always wanted to make something like it. I have no idea where it is from or what show it belongs to, if anyone knows the source please let me know using the comment system.
I happened to have a couple of turrets from two Italeri M108 kits which I always thought would make a good spaceship front when put together on their side. So cutting these up and spacing the bits apart I could make something a bit larger keeping the 1/35 scale.
Of course the size of the windows makes the scale much smaller than the sketch would suggest but as in my usual way I am making my own ship with that sketch as inspiration, which means I can do what I like and more importantly with what I have on hand.
Currently the top is left open to get access to the cockpit area.
It's all still very experimental at this stage as I have no idea what I am going to use for the truss that connects the front to the engines and hold the containers in place. I am also unsure exactly what I will use for the containers, though at this point I am considering plastic index card boxes.
I decided to crack on with an engine section and finding some nozzle like PVC pipe fittings in my box of bits I arranged them in a formation I liked and built a box to support them.
The usual ceramic bi-pin connectors have been installed with a couple of led down lights I had left over from the Shuttlepod project. These are mounted in the two big nozzles, the two smaller nozzles I may use some garden lights like the Escape Pod Mk2 project unless I find something brighter and better. In the pictures below one of the side panels is still to be glued in place so that the interior construction can be seen. The triangular gussets are the scraps cut off the bulkheads, here being employed to hold the bulkheads perpendicular to the top and bottom panels before the side panels go on. It all helps to make for a rigid and square structure.
The holes in the side panels will be access hatches to help installing the lamps. Its pretty impossible to get the pins to line up otherwise.
It is very apparent that the engine module is of a similar design to my earlier Sony Spaceship and not at all like the tri cylinder design of the sketch. I happen to like the more vertical orientation which in any case is suggested by the cockpit of the sketch.
I intend to get back to the Bulk Cargo project but who knows what other distractions await...
I was looking through an old display book where I had put some inspirational spaceship pictures way back in the 90's and came across a tiny sketch that I had enlarged and printed out from a Japanese modeling magazine. I really liked the design of the container space ship which is like a giant version of an Eagle transporter and always wanted to make something like it. I have no idea where it is from or what show it belongs to, if anyone knows the source please let me know using the comment system.
I happened to have a couple of turrets from two Italeri M108 kits which I always thought would make a good spaceship front when put together on their side. So cutting these up and spacing the bits apart I could make something a bit larger keeping the 1/35 scale.
Of course the size of the windows makes the scale much smaller than the sketch would suggest but as in my usual way I am making my own ship with that sketch as inspiration, which means I can do what I like and more importantly with what I have on hand.
Currently the top is left open to get access to the cockpit area.
It's all still very experimental at this stage as I have no idea what I am going to use for the truss that connects the front to the engines and hold the containers in place. I am also unsure exactly what I will use for the containers, though at this point I am considering plastic index card boxes.
I decided to crack on with an engine section and finding some nozzle like PVC pipe fittings in my box of bits I arranged them in a formation I liked and built a box to support them.
The usual ceramic bi-pin connectors have been installed with a couple of led down lights I had left over from the Shuttlepod project. These are mounted in the two big nozzles, the two smaller nozzles I may use some garden lights like the Escape Pod Mk2 project unless I find something brighter and better. In the pictures below one of the side panels is still to be glued in place so that the interior construction can be seen. The triangular gussets are the scraps cut off the bulkheads, here being employed to hold the bulkheads perpendicular to the top and bottom panels before the side panels go on. It all helps to make for a rigid and square structure.
The holes in the side panels will be access hatches to help installing the lamps. Its pretty impossible to get the pins to line up otherwise.
It is very apparent that the engine module is of a similar design to my earlier Sony Spaceship and not at all like the tri cylinder design of the sketch. I happen to like the more vertical orientation which in any case is suggested by the cockpit of the sketch.
I intend to get back to the Bulk Cargo project but who knows what other distractions await...
Monday, 24 October 2016
Escape Pod Mk2 part4 Completed.
Part1 Part2 Part3
I set about coming up with a paint scheme for the Escape Pod Mk2 the same way I tackled the design of the paint scheme for the Kitbash Shuttle project, namely taking the side view image of the grey primer model and messing about in Photoshop overlaying colours till I had something I liked.
The other deciding factor was that I had to make use of the colours I had on hand. Below is the original grey photo side view I started with and then the two rough versions I came up with.
The two versions are the same colours but with the reciprocal placement.
Because the Shuttle pod was already orange and I liked the mostly blue version best I chose that for the model. I had a spray can of Blue metallic car paint on hand. I don't usually like metallic car paints on a model because the metal flake is way over scale but it is what I had to hand and as it turned out once the weathering took off a bit of the gloss, I think it turned out OK.
The white markings where sprayed on using white primer. The numeral 2 was done by printing out the computer font onto paper, sticking that paper onto the back of some wide masking tape and carefully cutting along the outline with a scalpel blade. The masking tape was then carefully peeled off the cutting mat and transferred to the model. In the photoshop mock up I had a couple of letters "EP" for Escape Pod but I found they were just too tiny to cut by hand and peel of the mat without ripping apart, so I abandoned them. The black lettering on the tail is some more of the old Letraset dry transfer lettering I recently re-discovered in a box at home and the red pinstripe at the rear is a bit of ancient Letraline found in the same stash.
The weathering was done as per my usual technique described previously.
I also painted up one of the cheap figures I found in Target for the cockpit occupant and added some control panels and a joystick mounted on the sides of the seat.
That brings this project finally to a close but there are plenty more on the way.
Thanks for looking, more soon...
I set about coming up with a paint scheme for the Escape Pod Mk2 the same way I tackled the design of the paint scheme for the Kitbash Shuttle project, namely taking the side view image of the grey primer model and messing about in Photoshop overlaying colours till I had something I liked.
The other deciding factor was that I had to make use of the colours I had on hand. Below is the original grey photo side view I started with and then the two rough versions I came up with.
The two versions are the same colours but with the reciprocal placement.
Because the Shuttle pod was already orange and I liked the mostly blue version best I chose that for the model. I had a spray can of Blue metallic car paint on hand. I don't usually like metallic car paints on a model because the metal flake is way over scale but it is what I had to hand and as it turned out once the weathering took off a bit of the gloss, I think it turned out OK.
The white markings where sprayed on using white primer. The numeral 2 was done by printing out the computer font onto paper, sticking that paper onto the back of some wide masking tape and carefully cutting along the outline with a scalpel blade. The masking tape was then carefully peeled off the cutting mat and transferred to the model. In the photoshop mock up I had a couple of letters "EP" for Escape Pod but I found they were just too tiny to cut by hand and peel of the mat without ripping apart, so I abandoned them. The black lettering on the tail is some more of the old Letraset dry transfer lettering I recently re-discovered in a box at home and the red pinstripe at the rear is a bit of ancient Letraline found in the same stash.
The weathering was done as per my usual technique described previously.
I also painted up one of the cheap figures I found in Target for the cockpit occupant and added some control panels and a joystick mounted on the sides of the seat.
That brings this project finally to a close but there are plenty more on the way.
Thanks for looking, more soon...
Labels:
escape pod,
kit parts,
model,
plastic,
scratch built,
spacecraft,
spaceship
Wednesday, 19 October 2016
Bulk Cargo Lander part 2
Part 1
I am astounded that it has been over a year since I did the first part on this project.
I have done a bit of detailing work on the very top and bottom of the ship. The two central round shapes marked top and bot are removable caps that hide the mounting points and are yet to be detailed.
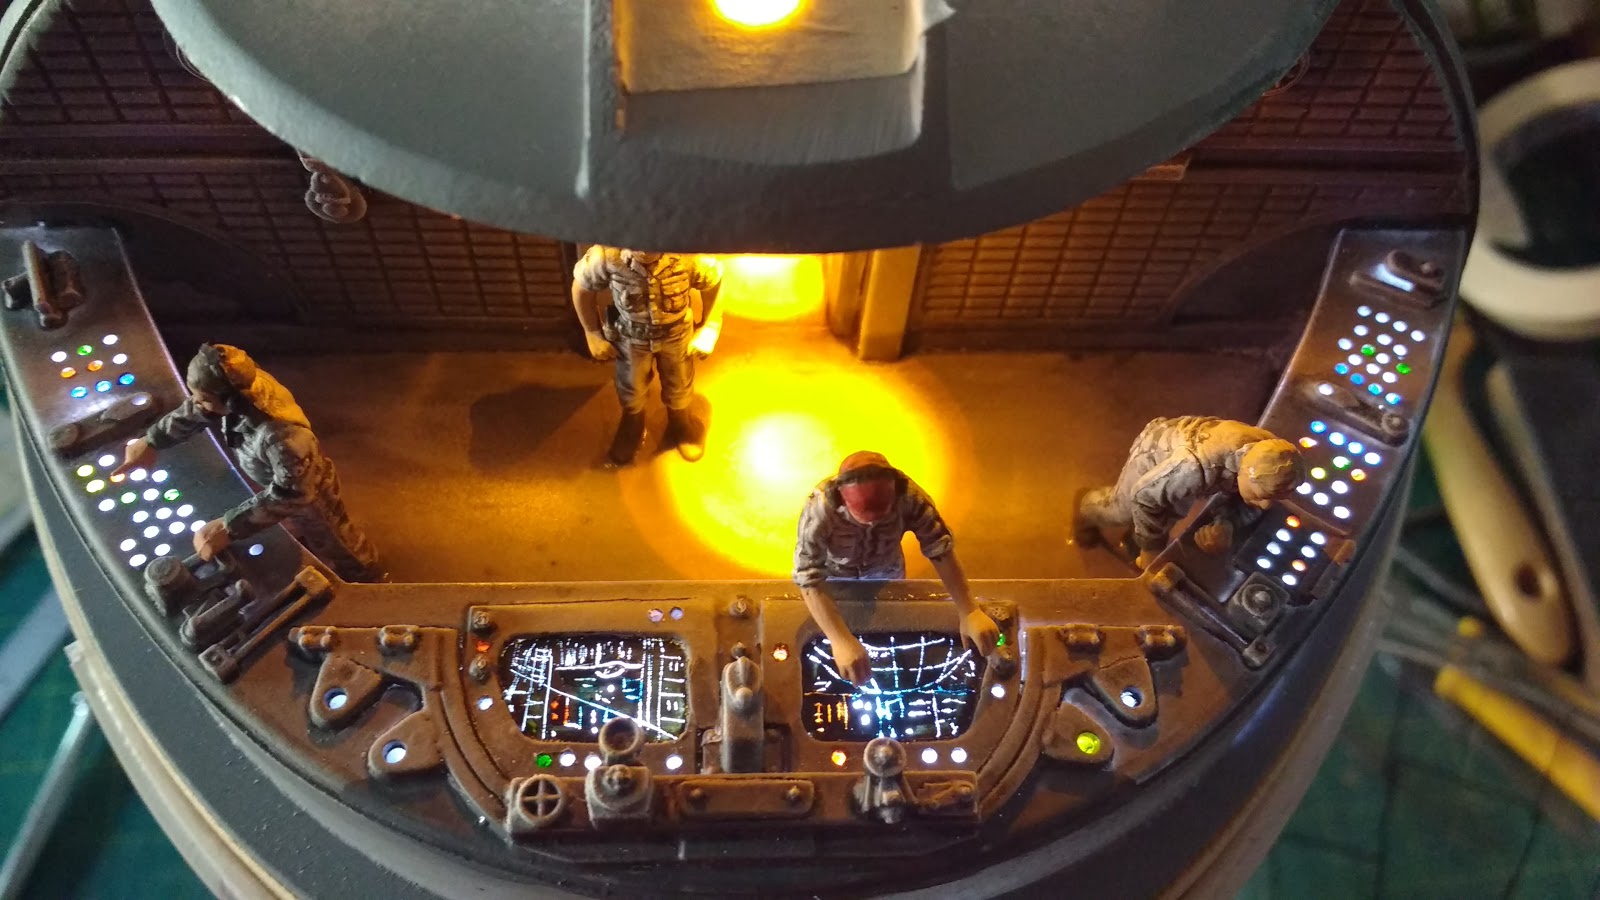
I have also been working on the cockpit and led lighting as well as starting some of the panel work. The main effort in paneling has been at the front and I needed the cockpit to figure out where the windows should sit. The panels are cut from the 1mm styrene I formed around the clear plastic crayola dome halves, as described in part 1. It varies in thickness depending on how much stretching of the plastic sheet has taken place.
The cockpit is made from 2mm and 1mm styrene sheet. The console top is made from one of the clear panels that come in the crayola domes. It is backlit by four white leds that have a voltage drop of 3 volts each and so don't need a resistor on 12volts DC that is being supplied from an old computer power supply, modded as per the instructions on one of the many you tube videos which describe the process.
The room lighting is by 4 amber leds with a 240 Ohm resistor preceding in series for the 12 volt supply as they only drop 2 volts each. Below you can see the rough test of the lighting with the front top dome half in position. This will be removable for access and is held on with 5 screws as described in part 1.
Detailing of the cockpit interior has been completed. One of the more interesting features is the textured back wall made from a disassembled VHS video cassette shell which has been cut up.
I filled a green wheely bin with old VHS tapes that I had lovingly collected over the years filled with rare monster, sci fi and VFX documentary films. I have not had a working VHS machine for over 6 years so I figured it was time to get rid of them, keeping some of the shells with the most interesting textured patterns for just such a use.
Below you can see the 1/48 deck crew figures temporarily placed in position.
After painting with a few coats of grey primer and weathered in my usual way I removed dots of the paint with a 1mm drill so the light from the white leds shine through revealing panel lights. Various dabs of Tamiya clear colours make the differing hues. The two central screens were painted with Tamiya flat black and when dry scratched away in a random fashion to suggest some sort of tech screens.
When the camera is lower, you get the full effects of the amber leds and that coupled with the two crew members that look like they are spinning some decks, makes for a decidedly club like atmosphere.
It looks like there is some serious Doof going on in there.
More soon...
I am astounded that it has been over a year since I did the first part on this project.
I have done a bit of detailing work on the very top and bottom of the ship. The two central round shapes marked top and bot are removable caps that hide the mounting points and are yet to be detailed.
I have also been working on the cockpit and led lighting as well as starting some of the panel work. The main effort in paneling has been at the front and I needed the cockpit to figure out where the windows should sit. The panels are cut from the 1mm styrene I formed around the clear plastic crayola dome halves, as described in part 1. It varies in thickness depending on how much stretching of the plastic sheet has taken place.
The cockpit is made from 2mm and 1mm styrene sheet. The console top is made from one of the clear panels that come in the crayola domes. It is backlit by four white leds that have a voltage drop of 3 volts each and so don't need a resistor on 12volts DC that is being supplied from an old computer power supply, modded as per the instructions on one of the many you tube videos which describe the process.
The room lighting is by 4 amber leds with a 240 Ohm resistor preceding in series for the 12 volt supply as they only drop 2 volts each. Below you can see the rough test of the lighting with the front top dome half in position. This will be removable for access and is held on with 5 screws as described in part 1.
Detailing of the cockpit interior has been completed. One of the more interesting features is the textured back wall made from a disassembled VHS video cassette shell which has been cut up.
I filled a green wheely bin with old VHS tapes that I had lovingly collected over the years filled with rare monster, sci fi and VFX documentary films. I have not had a working VHS machine for over 6 years so I figured it was time to get rid of them, keeping some of the shells with the most interesting textured patterns for just such a use.
Below you can see the 1/48 deck crew figures temporarily placed in position.
After painting with a few coats of grey primer and weathered in my usual way I removed dots of the paint with a 1mm drill so the light from the white leds shine through revealing panel lights. Various dabs of Tamiya clear colours make the differing hues. The two central screens were painted with Tamiya flat black and when dry scratched away in a random fashion to suggest some sort of tech screens.
When the camera is lower, you get the full effects of the amber leds and that coupled with the two crew members that look like they are spinning some decks, makes for a decidedly club like atmosphere.
It looks like there is some serious Doof going on in there.
More soon...
Labels:
1/48 scale,
model,
plastic,
scratch built,
spaceship,
VHS
Subscribe to:
Posts (Atom)
Most Popular Posts in the Last 7 Days
-
This model was started around the same time as the "Sony" model. It is so close to being finished I don't know why I didn'...
-
Grey primer - done. The engine bells are wrapped in cling film to mask them off. A commenter on facebook thought the "spare tire...
-
I believe I have completed the surface detailing phase of the project. The plain white panels are mostly cut from 0.5mm styrene sheet. The ...
-
This model was made in the late 90's. It was again made from a disparate collection of shapes. There is a central spine made of some PV...
-
I thought it might be interesting to look at some of my old Spaceship models starting with this one. While this model is not strictly an RC ...
-
The Ultraman production purchased a collection of miniature buildings that were originally made for an unfinished version of Total Recall ...