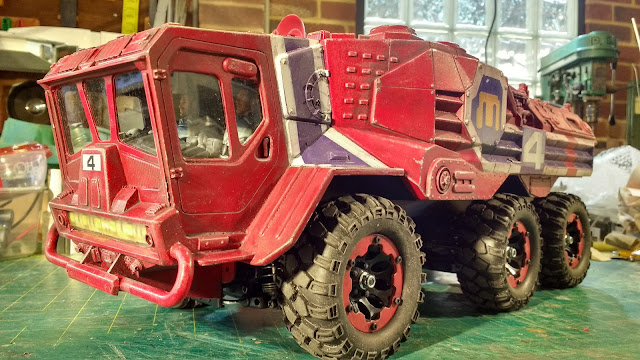
At the end of the last post I decided to add a few more nurnies to the front of the cab and have now done so completing the construction process by finalising the primer.
Then it was into photoshop to come up with a suitable colour scheme. I wanted to go bold with the colours for this truck and looked over a number of vehicle concept art pictures I have collected from the internet for inspiration. Here's what I arrived at as a very rough paintover of the primered side view;
I went to the auto parts shop and purchased some spray cans in the appropriate colours. The first can I tried was an old one that had been sitting on the shelf for quite some time. On pressing the trigger an ooze of thick goo came out of the nozzle. I shook it up some more and tested the spray on a piece of wood and it seemed to come good so I started spraying the model... the spray coming out was not a fine mist but a series of thick blobs. I tried the other similar colour I purchased and it was a newer can and sprayed a perfectly fine mist. So one side ended up with a thick textured finish and the other was more like I was expecting. This ended up causing me problems as the too thick acrylic lacquer paint and the perfectly fine primer will start coming straight of the styrene when you pull off the masking tape. It seems to dissolve the primer styrene bond interface and the stuff will almost fall off which it did in several places. Everytime I removed some masking I had to repair the paint, the model needed and got more and more heavily weathered through the process. The other issue is that I am trying to complete this model and at least another before exhibiting them at the Perth SupaNova event coming up in nearly a week and a half, so there is a deadline. I am taking some holidays before the show to get them done and I dont need any more disasters besides the fact thet the weather has not been conducive to paint drying.
The model is now pretty much done except for a voltage booster board from Hobby King to power the 12 volt lighting from a 7.2 volt battery. I have had the board on back order for a number of months and still no show.
Here is the result of the last few days;
On to the next model for completion.
More soon...
About this Blog
This is about the combination of two interests, Radio Control vehicles and Science Fiction models. This blog documents my science fiction spaceship and radio controlled vehicle projects.
Tuesday, 12 June 2018
Kong Head Toybash part 3
Labels:
1.9 tyres,
4WS,
6x6,
kitbash,
Kong Head,
plastic,
radio control,
RC,
SCI FI model,
Sci Fi vehicle,
Tamiya,
toybash,
Venom
Subscribe to:
Post Comments (Atom)
Most Popular Posts in the Last 7 Days
-
This model was started around the same time as the "Sony" model. It is so close to being finished I don't know why I didn'...
-
This model was made in the late 90's. It was again made from a disparate collection of shapes. There is a central spine made of some PV...
-
I thought it might be interesting to look at some of my old Spaceship models starting with this one. While this model is not strictly an RC ...
-
With a dozen or so of unfinished projects lying around I started a new one I call the Space Barge. Over a year ago I purchased a couple o...
-
There hasn't been much modeling going on for a while now as I was laid off at work and have been scrambling to find some employment. No...
-
Part 1 here Most of the large toybashed detail pieces have now been superglued to the underside of the flat top. The final placement diff...


Best blog on the internet.
ReplyDeleteGood luck with the Supanova exhibition.
Dude that's fantastic! I love the way you used that APC toy; I totally didn't recognise it until those early WIP pics. I've bookmarked your blog, your work is bloody fantastic!
ReplyDelete