About this Blog

This is about the combination of two interests, Radio Control vehicles and Science Fiction models. This blog documents my science fiction spaceship and radio controlled vehicle projects.

Friday 18 January 2013

Explorer Part 2

I have now done some of the detailing work on the back and built and detailed the roof of the cab.
It doesn't look like much until you hit it with a can of grey car primer. I intended to show the cab roof before and after the primer coat, but unfortunately got carried away and sprayed it before taking the photos. I always get excited when detailing, its the bit I enjoy the most. The tan coloured parts are from a 1/72 matchbox German tank kit, the dark grey from the ubiquitous 1/72 Hasegawa Leopold kit and the rest from a new purchase, a Trumpeter 1/35 Stryker kit., plus a bit of Evergreen, sheet styrene, bits of PVC and more pieces of 27mhz radio Control unit.


The photo below shows the stsrt of the upper hull detailing. The black ribbed panels are the sides from an old 27mhz radio control unit. You can also see an old computer CPU fan which will become some sort of airconditioning unit. It still works and I may hook it up to a power source. I need to come up with a grill to cover the fan.

 Here is the rear section with one grill installed. This was made from a sandwich of styrene strips glued up as one block then cut up to fit on the bandsaw.


 Here is the roof of the cab, detailed with the main top hull of the Stryker cut up and rearranged along with other parts and styrene ducting etc.


More to follow soon.

Part 1, Part 2, Part 3, Part 4, Part 5, Part 6.

Model Kit part detailing Guide


Leopold, its all over the original Battlestar Galactica series.

  The technique for detailing Sci fi surfaces with the parts from plastic model kits came into fruition with the models used in the many Gerry Anderson puppet series in the 1960s. It was then adopted for the models in 2001 a Space Odyssey where it developed into full maturity, and to stunning effect. Here for the first time were spacecraft and vehicles with a believability never before seen. Gone were the usual streamlined shiny silver cigar shaped rocket surfaces to be replaced with complex intricate utilitarian shapes, that caught the light and cast a jigsaw of shadows.

Over the years I have developed a set of guidelines or rules of thumb for detailing Sci Fi surfaces. A long time a go I made a study of model spaceships from the classic Sci Fi film and television shows to determine what I thought worked well and what didn't. Up front I have to say that I love the rich texture that the classic model kit parts style can give to a spaceship model, and I don't believe I have seen a CG spaceship that gives me the same satisfaction. I remember whilst watching Star Wars episode One, thinking that the cg spaceships really looked as good as models of old, only to discover that they were indeed models after all, no wonder they looked good. On the other hand the CG spaceships in Ep Three did not excite me at all.

Detail can come not only from model kit parts, but any suitable plastic that can be glued with a solvent based adhesive or super glue, generally styrene,  ABS or acrylic. Toys, kitchen goods, electrical goods and whatever else can be chopped up and looks cool. Evergreen  and EMA or Plastruct strips, rods, pipes and textured sheets are also very useful but also relatively expensive.


Here are my design guidelines for Sci Fi detailing in no particular order;

  1. CONNECT - The parts should appear to connect to each other, either with pipes, ducts or more abstractedly as a flow of parts. Basically they need to look like they do something, whether it be electrical, hydraulic or mechanical.
  2.  RECESS - Wherever  possible chunky detail always looks the best when below the surface or recessed. It can be in a trench or a hole or where a panel has been removed. The other possibility is to build up around an area so it appears recessed. Avoid just gluing big lumpy detail parts on top of the surface. Flat details such as panels, piping and ducting are OK .
  3. CLUMPING - Probably the most important rule. Detail should not be evenly spaced across the surface, it should clump together, much like trees clump together in a landscape.There should be a contrasting range of areas of very little detail and spots of intense detail. The clumps of detail may then connect together using pipes or ducts. The heights of the chunky detail should also be clumped like a grove of trees, taller in the centre and smaller as the clump radiates out, with some random variation.
  4. RANDOM - This is more of a re-inforcement of the Clumping rule, in that if you are going after a random distribution of detail, make sure that the spacing between each section is also random. One of the mistakes you can make is to randomly place detail in terms of location across the surface, but each location is about the same distance away from each other. Some areas of detail should be close to each other and some should be a long way apart, this is again the clumping rule. Also randomise the shapes, mix round with rectangular etc.
  5. THICKNESS - Where possible vary the thickness of flat panels, pipes, ducts, channels etc.
  6. ASYMMETRY - This is up to you, sometimes symmetry is appropriate, but asymmetry can look cool. It really depends on the subject.
  7. SCALE - The scale of the detail should match the scale of the subject. As a general suggestion, smaller scaled model kits  1/350 and above down to 1/72 suit small scale surfaces. Larger scale subjects require larger scaled lumps, 1/35 up to 1/12 scale kit parts. This is not a hard and fast rule it is just that too much fine detail on a 1/12 scale model starts to look odd as does 1/12 scale parts on a 1/500 scale model. I'm talking about surface detail here, larger scale model parts can become the actual structure of a small scale model quite happily which then get a layer of fine surface detail. Large and small here refers to the scale not to the size of the model. You can make a 1/1000 scale spaceship model 3 metres long if you want.
  8. MULTIPLES - When buying model kits it is often advantageous to have repeats of the same detail. Sometimes a kit may have multiples of the same part in it but if you can, for a really large model, get more than one of the same kit. The other option is to make a master detail section and mold and cast multiples of the panel. It is possible that for the hobbyist, the cost of the molding and casting materials exceeds that of a multiple kit purchase.
Once you have glued all your parts together it looks like a strange assortment of colours and shapes. It is not until you give it (after washing with hot water and detergent and drying thoroughly) a coat of grey car primer that you really see your work change from a bunch of kit parts, and styrene strips  to a unified whole that looks the business. Often a quick spray of grey is needed to see how you are progressing. You then have to scrape it away where you still need to add more bits.

You can see many examples of the guidelines on the Rebel Blockade Runner model from Star wars.
Notice the heaviest detail is in recesses and that when on the surface it tends to clump together.Also notice the detail is connected, it looks like it does something.


Detail in recesses, and clumped together.
Connection with pipes and areas of very little detail with detailed clumps.
Clumping and abstract connection with strips. Also asymmetry within symmetrical left and right details.


The type of detailing described here has been at times disparagingly called the "spray in glue and roll in kit parts" style. There have been at times attempts to avoid kit part detailing entirely. Many modelers hold the view that it is bad to use recognisable kit parts on models. I don't hold that view as I wouldn't want to deprive anybody of the joys of kit spotting. Personally I can't think of a single successful example of a sci fi movie spaceship design that didn't use any kit parts. Has there been any cool CG spaceships?
There is now masses of extremely good reference photos on the net of the very best of the style from the models built during the golden years of the 70's and 80's. When I began my study after Star Wars came out there was no Internet, I had buy every book and magazine I could lay my hands on, that had a photo of a model spaceship. I cut out all the pictures and made up a photo reference book that enabled me to sort the good stuff from the sub standard, and there was plenty of that in the post star wars frenzy. Now there is no excuse, armed with a couple of model kits and these guidelines you should be detailing with the best of them.


Monday 14 January 2013

Explorer

I'm ashamed to say it's been over a year since my last post. My modelling is usually in binges, in other words I do nothing else for a while until I hit a technical or design snag or lack of funds, then leave it alone. In the intervening time I have been learning about and building a couple of valve guitar amps and I'm halfway into a wooden sailboat build. Eventually I get my modelling mojo back and dive back in.

So I now present... a totally new project, the Explorer. It's some sort of mobile planetary exploration vehicle, a travelling laboratory and living quarters. It is based on Traxxas Summit running gear mounted on an extended Revo 3.3 chassis. The inspiration has come from "Snow Cruiser" an Antarctic explorer built in 1939.

Snow Cruiser 1939
Snow Cruiser was a roving base for a crew of 5, consisting of four 10 foot high electrically powered and individually steerable wheels. It housed two 150 hp diesel generators to power the electric wheel motors, as well as living quarters, kitchen,machine shop, photo lab, communications and storage for a years supply of food.

Yes, I know I haven't finished any of the other projects yet, don't worry I will get back to them, eventually.
All the parts were sourced from the usual place Ebay, from the many RC parts-stripping vendors who buy new kits, and break the model down into components to sell off cheaper than the pre-packaged spare parts.


I've got an older EVX2 speed control which doesn't have low voltage cutoff so I have added a Novak 2C Smart stop unit. The Summit uses two battery packs which connect in series internal to the ESC. The smart stop is wired in with one of the ESC's battery connectors, the side which provides the BEC. It means that only one of the packs is being monitored by the Smart stop, but you can assume the other pack is discharging a similar rate. Here is an extremely helpful wiring diagram courtesy of SuicideNeil from robotwars.00server.com.
Extremely helpful wiring diagram courtesy of SuicideNeil from robotwars.00server.com
Note that the two Titan 550's are replaced with a single Titan 750 in this application. The E Revo uses a pair of standard motors whereas the Summit uses the one larger donk. The new version of the Smart Stop is self sensing so it can cope with 2c-4c packs. There is a pile of much cheaper alternatives from Hobby King which plug directly into the balance lead of the pack which is pretty simple and convenient.
This larger motor is the same size as used in many cordless drills, I have one out of an old Panasonic drill which even has a 32 pitch pinion gear mounted which mates happily with the Summit transmission.


Two aluminium angle battery trays have been attached with my usual aluminium brazing rods.
There is still some work to do on the chassis, bracing the battery trays and a micro servo mount for Hi-Lo gear changing duties. One of the other features of the Summit is remote diff locking, at this stage I think I will just leave that as a manual switch rather than getting the push rod runs sorted out for servos.
I will also need the stiffest springs I can find, the purple ones, as the body is likely to be relatively heavy. Most Rc vehicles are designed to haul around a lightweight Lexan body however in the world of RC-SCIFI it is more likely going to have to deal with a heavy hand made shell loaded with "stuff". The suspension is one of the main technical obstacles to overcome, coping with the extra weight. It has consequences for the drive line as well, but most RC vehicles are engineered for extreme speed and that comes with a degree of over engineering that will cope with greater mass at the lower speeds that these SCIFI models will run. It just means gearing down for torque, rather than up for speed.
The two speed of the Summit tranny is perfect for this.

The tyres and wheels are Proline, They are huge, 3.8" 40 series, 175mm tall, 87mm wide on 17mm Traxxas hubs.

With the chassis well on the way, I turned my attention to designing a body. I started a few rough thumbnails, when I say rough I mean really rough.
Armed with these I drew up a full size side view template on cardboard, checking against the chassis.
I used 6mm ply wood ( probably overkill but it's what I had lying around, my philosophy is use up what you have, first) for the structure. I bored and hole sawed out lightening holes wherever possible.
It was all glued up with Aliphatic wood glue which is immensely strong but slow to dry. Other less critical wooden components used a fast set pva glue. The top of the shell was skinned with 2mm plywood, again because I had a piece the right size and because the wood to wood bond is very strong.


Sections are skinned with 1mm high impact styrene sheet, which in this case happens to be black. It is more usually white, but its what my local supplier had. It is much cheaper to source this styrene sheet from a plastics supplier than buy the tiny expensive sheets in the hobby store. This model is BIG it uses a lot more materials than a 1/35 scale military diorama. The styrene is sanded to provide a rough "keyed" surface for the green Zap-a-gap superglue to bond well with the wood parts. Some judicious applications of zip kicker accelerator also help with bonding to wood. The super glue joint is very brittle and is generally not good for parts subject to shock. An RC vehicle is often subject to shock, hitting things due to mistakes or poor driving, however when there is no better method of attachment it is used. As there is a very strong and resilient wooden under structure it should work out fine here.

Styrene to Styrene bonding as well as acrylic ( perspex), I use Methylene Chloride, a known carcinogen. Unfortunately there really isn't anything better. I make sure to use it with excellent ventilation, I usually have a fan moving air past the work area and doors and windows of my shed open for fresh air flow. It is applied with a cheap nylon modelling brush from an EMA pump dispenser which I have had for years ( a very long time ago, before the advent of Computer Graphics, I was a professional model maker). The plastic container perished so I replaced it with an old poly- ethylene ink container. Poly-ethylene is not dissolved by the Methylene Chloride.
One brush has a bent end which enables getting the solvent to spots difficult to reach, undersides and the like.


Finally here is a view of the body work so far.

I realised once I started that the original design did not allow any room for the cockpit because of the huge wheel wells. So a re-design was in order, raising the cockpit up higher and changing the scale a bit. I did another rough thumbnail to sort that out. As it turned out this is closer to the original Snow Cruiser concept.


Redesigned cockpit


I decided that it was about 1/12 scale so had a look in the local toy store for suitable figures and found these 1/12 Star trek figures going cheap which would suit perfectly.


 The idea with the body was that it was some sort of welded truss construction, with infilled panels.


The white strips are cut from 47 X47mm 4mm thick pvc angle, used for Hardy panel (fibro cement) building corners. Again the gluing surface is roughed up with course sandpaper for the super glue to key. Pvc sticks quite well with super glue as long as it is sanded first. The PVC here is actually a type of very dense foam, so it is not quite as heavy as solid PVC sheet, being about half the weight. The foamed PVC in sheet form, is, or was, a common material used for movie miniatures. It is not effected by methylene Chloride, so it has to be bonded with PVC cement or superglue. Styrene parts have to be superglued to it.

Rear detail is from an old 27mhz am radio control unit.

Test layout of some detail parts, sides from the RC control unit and a part from a Leopold model kit, plus a cpu fan which will become some sort of air conditioning unit.

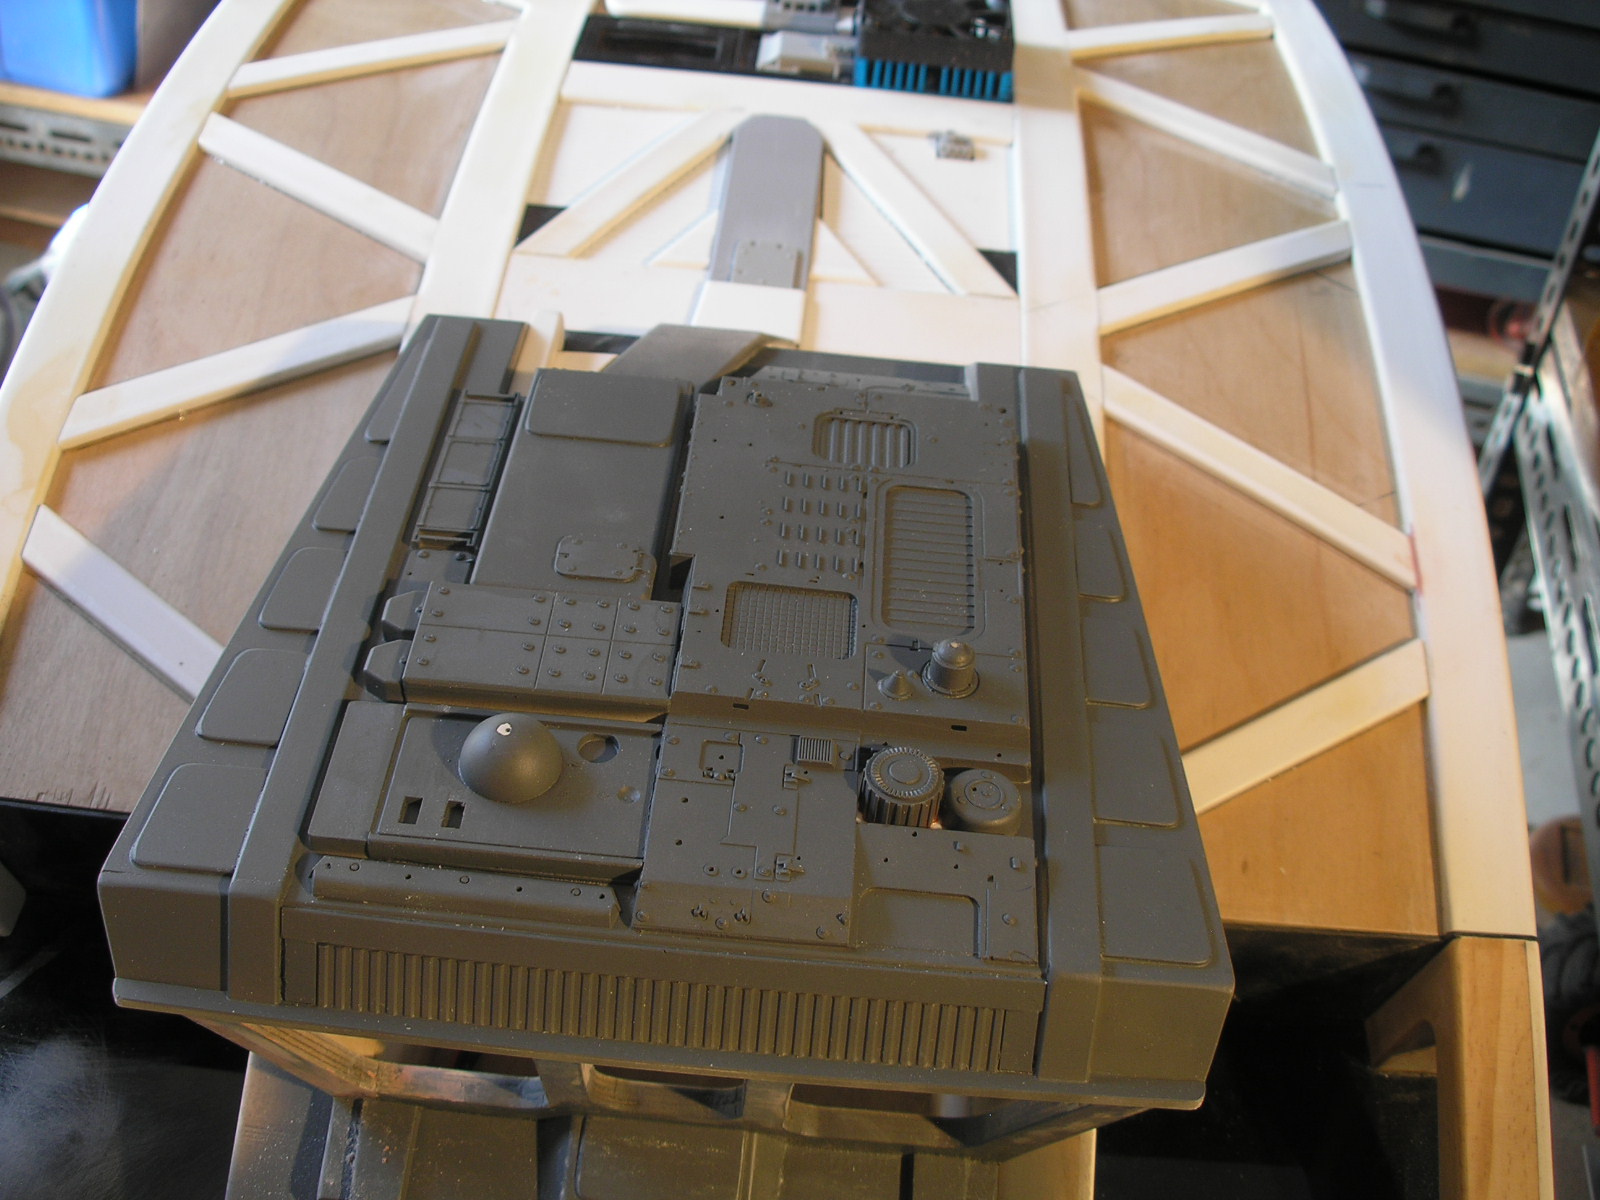
Domes cut from PVC pipe end caps.
Inset detail from disposable camera parts...

...which get hidden behind a grill, made from the battery door of the radio control unit.

These are the door panels, made from an old modem. More detail to be added.

As predicted, this body is indeed quite heavy for the suspension. The current front springs are drooping to the floor at the moment, notice the block under the front holding it up. I hope the purple springs will cope. I may have to custom make some stiffer ones or get them made, we will see.

 That's it for the moment. The next post will not be a year away, it will be soon, I promise.

Part 1, Part 2, Part 3, Part 4, Part 5, Part 6


Most Popular Posts in the Last 7 Days