About this Blog

This is about the combination of two interests, Radio Control vehicles and Science Fiction models. This blog documents my science fiction spaceship and radio controlled vehicle projects.
Showing posts with label rc vehicle. Show all posts

Thursday, 26 February 2026

AI Desert Racer RC vehicle part 2

 After layers of spray putty, primer, spot putty and sanding I finally got a reasonably smooth 3D printed body with almost no layer lines visible. Then it was time to fit out the cockpit.

The front suspension shock absorbers intruded into the cockpit area a bit so the seating and indeed the backs of the Tamiya 1/12 scale Formula One driver figures had to be relieved for clearance. The seating was made from 3mm foamed pvc heat bent into an S shape to fit the driver figures. 


Once that issue was sorted I could begin adding kit part detail to flesh out the interior. 

The figures required some modification to get their hands into position and the steering wheel was made from a piece of 2mm styrene, filed to shape.


The exterior body work was scribed into panels using an OLFA plastics cutter and was followed with a coat of grey primer for both the interior and exterior of the vehicle.


Thanks for looking.

More soon...


Saturday, 25 October 2025

Hardware Shipbreakers LAV part 2

The Speed controller is a cheap brushed controller capable of running 3s - 6s (12 - 24 volts). I'm only using two 2s lipos in series providing 4s at 14.4 volts.


The lighting plugs into the balance lead of one of the batteries and runs through a voltage booster to increase the 7.2 volts to 12 volts. The plug is made from some PCB pins and a blob of hot glue. It plugs into the red and black wires of the balance connector.


I am running a three channel radio so the third channel is for the two speed gear shift. The lights will have to be plugged in manually and left on (or off) all the time rather than be switched on remotely from the transmitter which is what I usually do.

Once the chassis and electrics was fully sorted it was back to the body to complete all the details.
First up was the tubular bumper.

I made a plywood jig that incorporated all the angles needed and then using a hot air gun bent a 10mm diameter solid ABS rod into shape each corner at a time.


This was attached to the front of the body with some gussets as per the concept art. Also added was a small cylindrical bit of detail made from some PVC conduit, evergreen textured sheet and a 1/25 truck kit wheel.


A smaller diameter ABS rod was heat bent for the lighting rail on the roof.


On the other side is a larger diameter cylindrical Air filter like thing made in a similar fashion. It is attached with screws on the inside. The rubber hose is a short piece of round spongy neoprene rubber rod. Like the solid ABS rod it can be bent with out folding in on itself though in this case it is not heat bent.

Vents in the sides of the hood were made from triangular grey plastic strip and glued on.


Skirts were made to bring the body profile down to meet the RC chassis ans detailed with strips of 3mm foamed PVC and a few kit parts.


I could not find any concept artwork showing the rear of the vehicle so I just made it up with some detail parts. The green panels are the roofs of two rubbish truck toys complete with their orange light bezels. The two tanks are made from PVC plumbing parts. 
I decided to put some white LEDs behind the orange light bezels.


Spot lights are a purchased 1/10 scale item which I installed white LEDs inside.


Next up were the side mirrors. The housings were drawn up in Onshape and 3D printed. Perspex mirror was cut up and clipped into the housings and a brass rod support made.


Lastly was the short ladder and handrail shown in some of the concept pictures. the rod is 5mm diameter solid ABS with ladder sides from 2mm styrene.


That wraps up the construction phase.
Next up is paint.


Thanks for looking.
More soon...


Saturday, 19 February 2022

Creeper 6X6 part 8

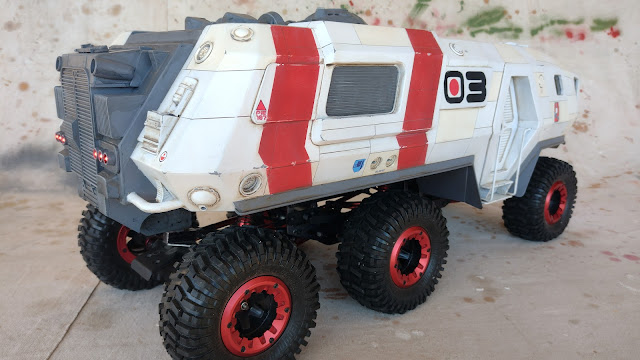
 The Creeper 6X6 project is now complete.

The primer grey model was sprayed with primer flat white and then random panels were masked up and sprayed with a satin off white colour and a satin white. All these paints are from spray cans of the Rustoleum 2X cover range. 


  I then took a photo at that stage and fiddled about in photoshop to determine a pleasing marking scheme.


The red markings were masked up and sprayed with an ancient tin of Humbrol flat red. The edges of the masking for the red markings had a few dabs of liquid latex masking medium to leave some chipped edges. Stupidly I only did this on one side forgetting to do it on the second side. Some dabs of white paint and some rubbing with a rag dampened with methylated spirits during the application of the wash soon remedied that omission. 

The numbers were designed on Inkscape and then printed out full size on paper. The paper numerals were then stuck with double sided tape to some masking tape applied to the model. The outline of the text was then carefully cut around with a scapel using a steel ruler for the straight bits and freehand for the curves. The number shapes were then peeled out and the numerals sprayed with flat black. It is not perfect up close but is good enough to pass.

That was left to dry out for a week and then I began the weathering process by applying a brown wash of Tamiya flat black and red brown mix heavily diluted with metho into all the scribed panel lines and around the edges of any detail. The grey roof detail sections received a flat black wash to further accent the recesses. Then using a metho soaked rag the surface wash was wiped clean in the direction of any desired streaks. The grey parts were then drybrushed using white students acrylic paint

The Humbrol red paint even after drying can still be loosened with the metho rag so I had to be careful not to rub it all away. I do however like the effect it has on weathering the paint, making it look sun and rain damaged. One just has to be judicious in the application and wipe off the red residue on the white areas which are not effected.

Using an acrylic grey paint I then added some chipping to the exposed bits of the body that would be susceptible to any graze damage. I also used applied this treatment to any paint finish anomalies to cover them up.  

The last thing was to add a few decals, mostly from the sheet I made up for the  Moon Bug project. Once the decals were dry I masked up the panels they were applied to and sprayed a coat of clear flat. The red dot in the middle of the black zero in front of the three is also a decal. It just happened to fit and I liked the graphic effect.

Finally here is the completed model.


Only eleven years in the making. I think it has turned out the way I had hoped when I started the project back in 2011. It was a very tortuous route but I learnt a lot along the way and it was the genesis for many of my completed RC vehicle projects.

Thanks for looking.

More soon...


Most Popular Posts in the Last 7 Days