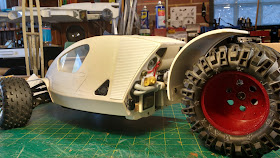
The mudguard is made from 2mm foamed pvc sheet formed around a large diameter pvc pipe using a gentle application of a heat gun. The edges were doubled with strips of 2mm pvc and sanded round. The black bits are some 1mm styrene sheet superglued on with the aid roughing up the mating surfaces with coarse sandpaper.
The mudguard is held on to the swing arm by a bracket made from some aluminium angle cut and filed to shape and pop riveted to the top of the arm. The pvc mudguard is attached with three m3 cap screws and lock-nuts with a washer on the inside bearing against the soft-ish pvc.
To protect the motor wires which are pretty exposed on the side of the swing arm I made a little guard from some pvc pipe and sheet superglued together in the usual fashion. It is reinforced with a fillet made from a hefty application of baking soda and thin superglue. This may still prove to be too fragile and something more robust will have to be made up. At the moment it is being temporarily held in place with double sided tape. I am thinking of using some double sided foam tape to affix it permanently once the swing arm is painted.
Because this is a sci fi model, it received the customary (perhaps even compulsory) kit part detailing, in this case on the rear wall.
Most of this is tucked away in between the body and the rear mudguard. The radiator like shape is a chopped up part of the top of the wing of a Klingon bird of prey model kit, which I got in an ice-cream container of parts I was given by a very generous donor. The red piping is some single core insulated copper wire fixed with a couple of drops of thin super-glue.
The nose also got a kit part and two buttons from an old computer keyboard.
I have also made a start on the interior with some panels to help hide all the RC electronics and a small instrument panel steering wheel console.
The front tyres are a bit of a curiosity. They are Schumacher grass racing 2.2 inch truck tyres. I acquired them many years ago when I bough an old Losi truck from a guy from the UK when I used to race trucks very briefly in the mid nineties. They are never seen in Australia as here offroad racing is more usually held on clay or brick dust tracks. They are made from very hard rubber. As usual they've been sitting around in a box since then and they fit these Proline Agitator Chrome 2.2" wheels Ive also had for years which are molded to take bearings rather than a hex for the front end of a 2WD Jato.
All I've got to do now is finish the interior and then it's on to paint.
More soon...


This is Amazing. I found your post because I was looking for a scale comparing Bruder Action Figures to Corps and other Gi joe like figures. But I really like what you are doing. Do you make videos at all to go with your very thought out and detailed post?
ReplyDeleteI dont do videos at the moment but have plans to do so sometime in the future.
DeleteThis one is spectacular. Can't wait to see the paint job.
ReplyDeleteGreat looking, but... remove that brushed can-motor asap. Use a pancake brushless 500kV on 2s LiPo instead and she will drive like a hot summer breeze.
ReplyDeleteThe can motor is there because it mates to an inline gearbox which enables that large rear tyre to rotate at a sensible rpm with enough torque to move the vehicle. If you can suggest a gearbox that will output around 400 rpm at max speed and it fits the pancake motor I will give it a try. A motor by itself wont do the job.
ReplyDelete